转载自:https://www.jianshu.com/p/2b2d1f511959
原理
双向认证,顾名思义,客户端和服务器端都需要验证对方的身份,在建立Https连接的过程中,握手的流程比单向认证多了几步。单向认证的过程,客户端从服务器端下载服务器端公钥证书进行验证,然后建立安全通信通道。双向通信流程,客户端除了需要从服务器端下载服务器的公钥证书进行验证外,还需要把客户端的公钥证书上传到服务器端给服务器端进行验证,等双方都认证通过了,才开始建立安全通信通道进行数据传输。
单向认证流程
单向认证流程中,服务器端保存着公钥证书和私钥两个文件,整个握手过程如下: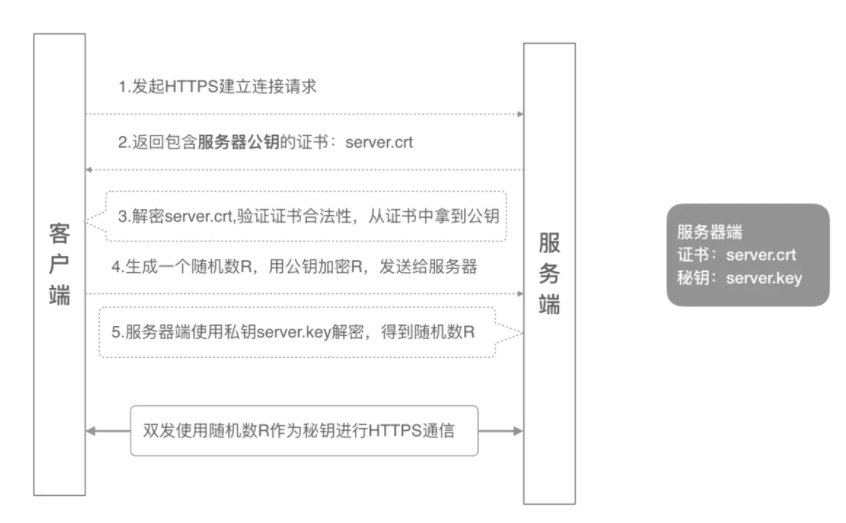
- 客户端发起建立HTTPS连接请求,将SSL协议版本的信息发送给服务器端;
- 服务器端将本机的公钥证书(server.crt)发送给客户端;
- 客户端读取公钥证书(server.crt),取出了服务端公钥;
- 客户端生成一个随机数(密钥R),用刚才得到的服务器公钥去加密这个随机数形成密文,发送给服务端;
- 服务端用自己的私钥(server.key)去解密这个密文,得到了密钥R
- 服务端和客户端在后续通讯过程中就使用这个密钥R进行通信了。
双向认证流程
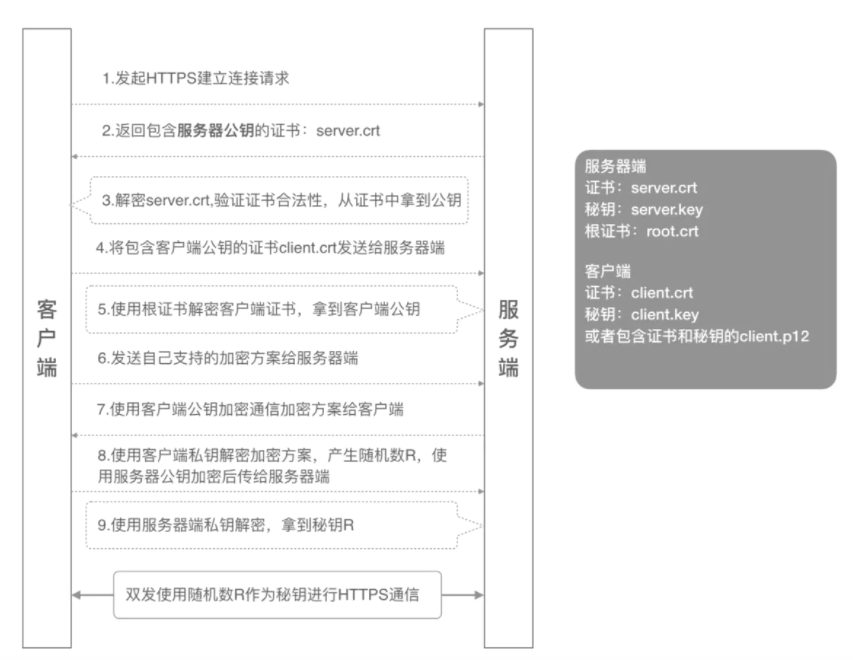
1. 客户端发起建立HTTPS连接请求,将SSL协议版本的信息发送给服务端;
2. 服务器端将本机的公钥证书(server.crt)发送给客户端;
3. 客户端读取公钥证书(server.crt),取出了服务端公钥;
4. 客户端将客户端公钥证书(client.crt)发送给服务器端;
5. 服务器端使用根证书(root.crt)解密客户端公钥证书,拿到客户端公钥;
6. 客户端发送自己支持的加密方案给服务器端;
7. 服务器端根据自己和客户端的能力,选择一个双方都能接受的加密方案,使用客户端的公钥加密8. 后发送给客户端;
8. 客户端使用自己的私钥解密加密方案,生成一个随机数R,使用服务器公钥加密后传给服务器端;
9. 服务端用自己的私钥去解密这个密文,得到了密钥R
10. 服务端和客户端在后续通讯过程中就使用这个密钥R进行通信了。
证书生成
从上一章内容中,我们可以总结出来,如果要把整个双向认证的流程跑通,最终需要六个证书文件:
- 服务器端公钥证书:server.crt
- 服务器端私钥文件:server.key
- 根证书:root.crt
- 客户端公钥证书:client.crt
- 客户端私钥文件:client.key
- 客户端集成证书(包括公钥和私钥,用于浏览器访问场景):client.p12
生成这一些列证书之前,我们需要先生成一个CA根证书,然后由这个CA根证书颁发服务器公钥证书和客户端公钥证书。为了验证根证书颁发与验证客户端证书这个逻辑,我们使用根证书办法两套不同的客户端证书,然后同时用两个客户端证书来发送请求,看服务器端是否都能识别。下面是证书生成的内在逻辑示意图: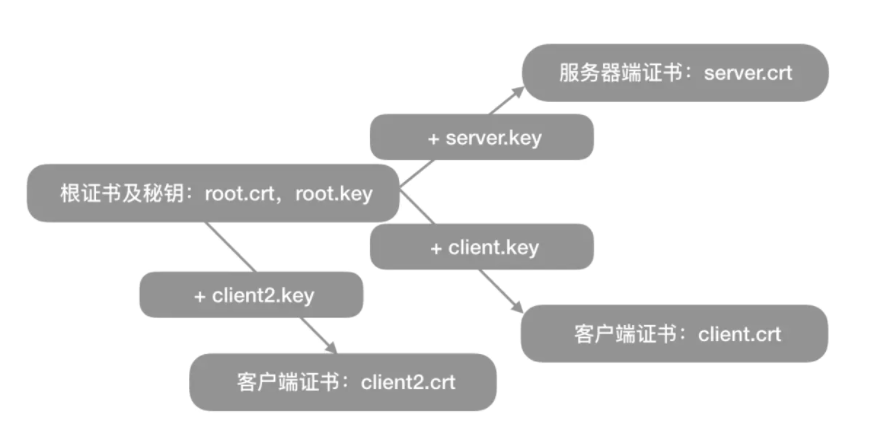
我们可以全程使用openssl来生成一些列的自签名证书,自签名证书没有听过证书机构的认证,很多浏览器会认为不安全,但我们用来实验是足够的。需要在本机安装了openssl后才能继续本章的实验。
生成自签名根证书
(1)创建根证书私钥:
openssl genrsa -out root.key 1024

(2)创建根证书请求文件:
openssl req -new -out root.csr -key root.key
后续参数请自行填写,下面是一个例子:
Country Name (2 letter code) [XX]:cn
State or Province Name (full name) []:bj
Locality Name (eg, city) [Default City]:bj
Organization Name (eg, company) [Default Company Ltd]:alibaba
Organizational Unit Name (eg, section) []:test
Common Name (eg, your name or your servers hostname) []:root
Email Address []:a.alibaba.com
A challenge password []:
An optional company name []:

(3)创建根证书:
openssl x509 -req -in root.csr -out root.crt -signkey root.key -CAcreateserial -days 3650
在创建证书请求文件的时候需要注意三点,下面生成服务器请求文件和客户端请求文件均要注意这三点:
根证书的Common Name填写root就可以,所有客户端和服务器端的证书这个字段需要填写域名,一定要注意的是,根证书的这个字段和客户端证书、服务器端证书不能一样;
其他所有字段的填写,根证书、服务器端证书、客户端证书需保持一致
最后的密码可以直接回车跳过。
经过上面三个命令行,我们最终可以得到一个签名有效期为10年的根证书root.crt,后面我们可以用这个根证书去颁发服务器证书和客户端证书。
生成自签名服务器端证书
(1)生成服务器端证书私钥:
openssl genrsa -out server.key 1024

(2) 生成服务器证书请求文件,过程和注意事项参考根证书,本节不详述:
openssl req -new -out server.csr -key server.key

(3) 生成服务器端公钥证书
openssl x509 -req -in server.csr -out server.crt -signkey server.key -CA root.crt -CAkey root.key -CAcreateserial -days 3650
经过上面的三个命令,我们得到:
- server.key:服务器端的秘钥文件
- server.crt:有效期十年的服务器端公钥证书,使用根证书和服务器端私钥文件一起生成
生成自签名客户端证书
(1)生成客户端证书秘钥:
openssl genrsa -out client.key 1024
openssl genrsa -out client2.key 1024

(2) 生成客户端证书请求文件,过程和注意事项参考根证书,本节不详述:
openssl req -new -out client.csr -key client.key
openssl req -new -out client2.csr -key client2.key

(3) 生客户端证书
openssl x509 -req -in client.csr -out client.crt -signkey client.key -CA root.crt -CAkey root.key -CAcreateserial -days 3650
openssl x509 -req -in client2.csr -out client2.crt -signkey client2.key -CA root.crt -CAkey root.key -CAcreateserial -days 3650


(4) 生客户端p12格式证书,需要输入一个密码,选一个好记的,比如123456
openssl pkcs12 -export -clcerts -in client.crt -inkey client.key -out client.p12
openssl pkcs12 -export -clcerts -in client2.crt -inkey client2.key -out client2.p12
重复使用上面的三个命令,我们得到两套客户端证书:
client.key/client2.key:客户端的私钥文件
client.crt/client2.key:有效期十年的客户端证书,使用根证书和客户端私钥一起生成
client.p12/client2.p12:客户端p12格式,这个证书文件包含客户端的公钥和私钥,主要用来给浏览器访问使用
Nginx配置
有了上面的一些列证书,我们可以在Nginx服务器上配置双向认证的HTTPS服务了,具体配置方式如下:
server {
        listen 443 ssl;
        server_name www.yourdomain.com;
        #server公钥证书
        ssl_certificate /data/sslKey/server.crt;
        #server私钥
        ssl_certificate_key /data/sslKey/server.key;
        #根证书,可以验证所有它颁发的客户端证书
        ssl_client_certificate /data/sslKey/root.crt;
        #开启客户端证书验证
        ssl_verify_client on;
        location / {
            root   html;
            index  index.html index.htm;
        }
    }
具体就是将服务器端的两个证书文件(server.crt/server.key)和根证书文件(root.crt)的路径配置到nginx的server节点配置中,并且把ssl_verify_client这个参数设置为on。
有一点需要注意的就是,如果客户端证书不是由根证书直接颁发的,配置中还需要加一个配置:ssl_verify_depth 1;
配置完成后,执行nginx -s reload重新加载下就生效了。
使用浏览器作为客户端调用验证
不使用证书访问
不使用证书,直接浏览器打开访问: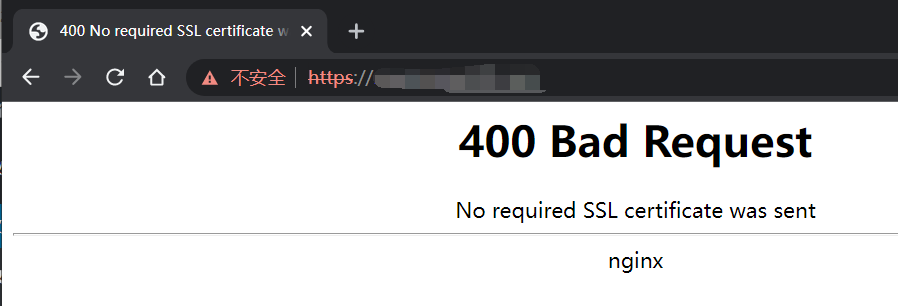
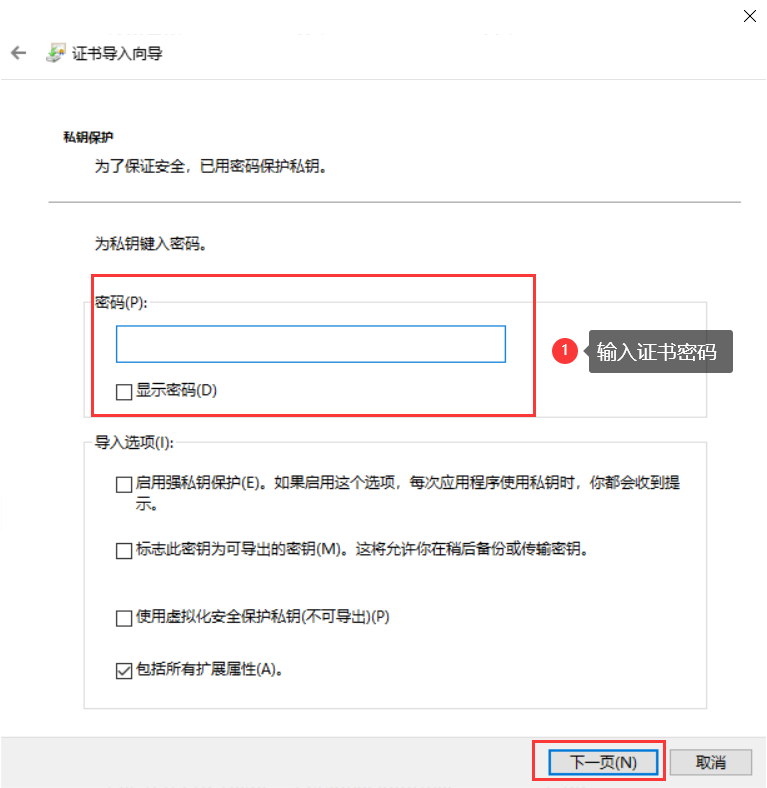
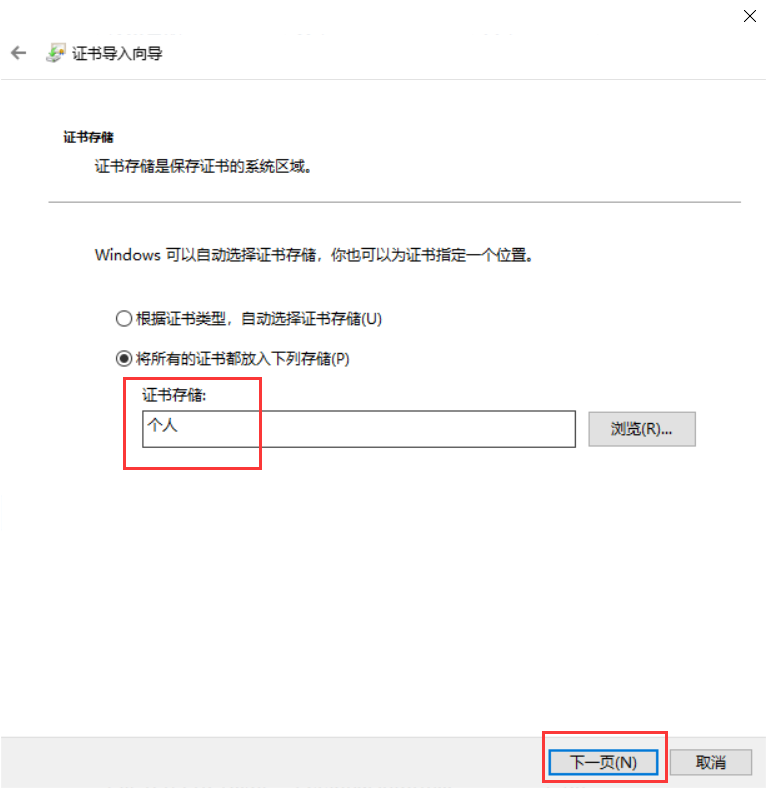
导入证书
双击client.p12或client2.p12导入证书: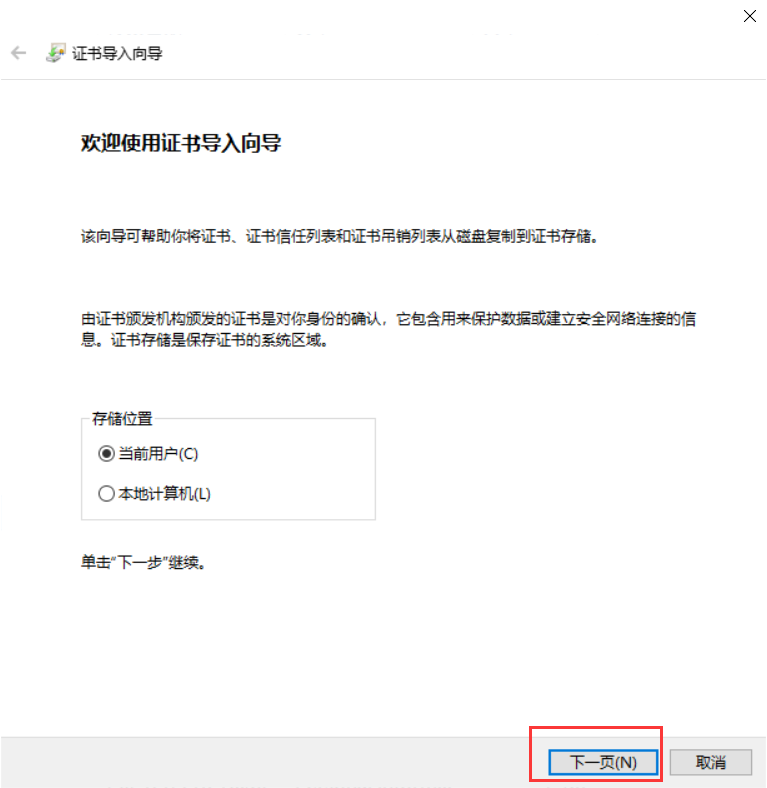
导入证书后,关闭浏览器,重新打开,输入测试网址,会弹出“选择证书”弹框: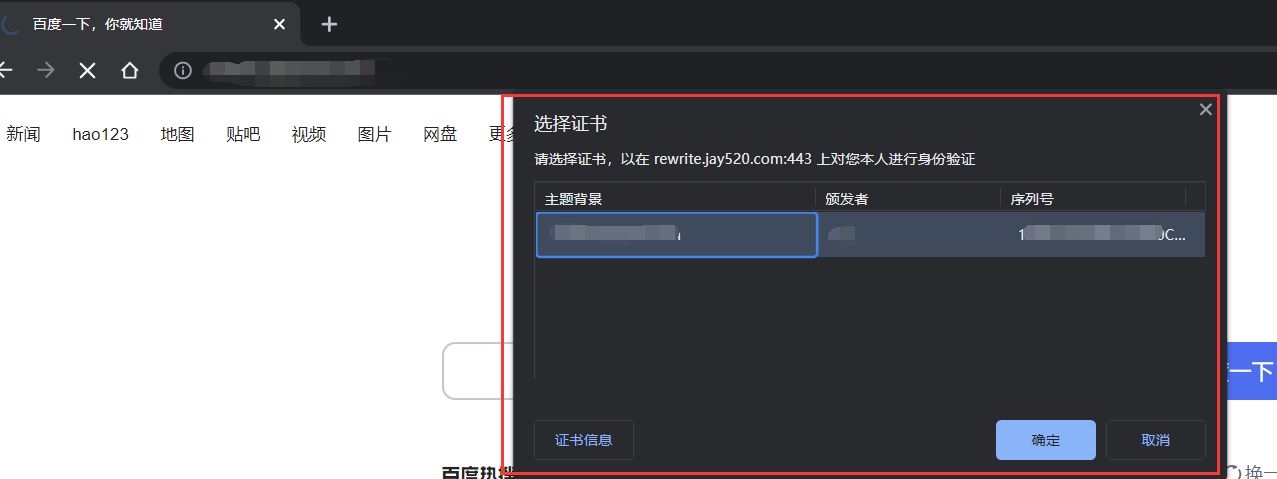
点击确定即可正常访问。
使用curl作为客户端调用验证
使用curl加上证书路径,可以直接测试Nginx的HTTPS双向认证是否配置成功。下面我们测试三个用例:
- 使用client.crt/client.key这一套客户端证书来调用服务器端
- 使用client.crt2/client2.key这一套客户端证书来调用服务器端
- 不使用证书来调用服务器端
下面是三个用例的测试结果:
带证书的成功调用:
#--cert指定客户端公钥证书的路径
#--key指定客户端私钥文件的路径
#-k不校验证书的合法性,因为我们用的是自签名证书,所以需要加这个参数
#可以使用-v来观察具体的SSL握手过程

curl --cert ./client.crt --key ./client.key https://www.test.com -k -v
* Rebuilt URL to: https://47.93.245.203/
*   Trying 47.93.245.203...
* TCP_NODELAY set
* Connected to 47.93.245.203 (47.93.245.203) port 443 (#0)
* ALPN, offering h2
* ALPN, offering http/1.1
* Cipher selection: ALL:!EXPORT:!EXPORT40:!EXPORT56:!aNULL:!LOW:!RC4:@STRENGTH
* successfully set certificate verify locations:
*   CAfile: /etc/ssl/cert.pem
  CApath: none
* TLSv1.2 (OUT), TLS handshake, Client hello (1):
* TLSv1.2 (IN), TLS handshake, Server hello (2):
* TLSv1.2 (IN), TLS handshake, Certificate (11):
* TLSv1.2 (IN), TLS handshake, Server key exchange (12):
* TLSv1.2 (IN), TLS handshake, Request CERT (13):
* TLSv1.2 (IN), TLS handshake, Server finished (14):
* TLSv1.2 (OUT), TLS handshake, Certificate (11):
* TLSv1.2 (OUT), TLS handshake, Client key exchange (16):
* TLSv1.2 (OUT), TLS handshake, CERT verify (15):
* TLSv1.2 (OUT), TLS change cipher, Client hello (1):
* TLSv1.2 (OUT), TLS handshake, Finished (20):
* TLSv1.2 (IN), TLS change cipher, Client hello (1):
* TLSv1.2 (IN), TLS handshake, Finished (20):
* SSL connection using TLSv1.2 / ECDHE-RSA-AES256-GCM-SHA384
* ALPN, server accepted to use http/1.1
* Server certificate:
*  subject: C=CN; ST=BJ; L=BJ; O=Alibaba; OU=Test; CN=integration-fred2.fredhuang.com; emailAddress=a@alibaba.com
*  start date: Nov  2 01:01:34 2019 GMT
*  expire date: Oct 30 01:01:34 2029 GMT
*  issuer: C=CN; ST=BJ; L=BJ; O=Alibaba; OU=Test; CN=root; emailAddress=a@alibaba.com
*  SSL certificate verify result: unable to get local issuer certificate (20), continuing anyway.
> GET / HTTP/1.1
> host:integration-fred2.fredhuang.com
> User-Agent: curl/7.54.0
> Accept: */*
>
< HTTP/1.1 200 OK
< Server: nginx/1.17.5
< Date: Sat, 02 Nov 2019 02:39:43 GMT
< Content-Type: text/html
< Content-Length: 612
< Last-Modified: Wed, 30 Oct 2019 11:29:45 GMT
< Connection: keep-alive
< ETag: "5db97429-264"
< Accept-Ranges: bytes
<
<!DOCTYPE html>
<html>
<head>
<title>Welcome to nginx!</title>
<style>
    body {
        width: 35em;
        margin: 0 auto;
        font-family: Tahoma, Verdana, Arial, sans-serif;
    }
</style>
</head>
<body>
<h1>Welcome to nginx!</h1>
<p>If you see this page, the nginx web server is successfully installed and
working. Further configuration is required.</p>

<p>For online documentation and support please refer to
<a href="http://nginx.org/">nginx.org</a>.<br/>
Commercial support is available at
<a href="http://nginx.com/">nginx.com</a>.</p>

<p><em>Thank you for using nginx.</em></p>
</body>
</html>
* Connection #0 to host 47.93.245.203 left intact
使用client2.crt/client2.key这一套客户端证书来调用服务器端:
curl --cert ./client2.crt --key ./client2.key https://www.test.com -k
<!DOCTYPE html>
<html>
<head>
<title>Welcome to nginx!</title>
<style>
    body {
        width: 35em;
        margin: 0 auto;
        font-family: Tahoma, Verdana, Arial, sans-serif;
    }
</style>
</head>
<body>
<h1>Welcome to nginx!</h1>
<p>If you see this page, the nginx web server is successfully installed and
working. Further configuration is required.</p>

<p>For online documentation and support please refer to
<a href="http://nginx.org/">nginx.org</a>.<br/>
Commercial support is available at
<a href="http://nginx.com/">nginx.com</a>.</p>

<p><em>Thank you for using nginx.</em></p>
</body>
</html>
不带证书的调用:
curl https://integration-fred2.fredhuang.com -k
<html>
<head><title>400 No required SSL certificate was sent</title></head>
<body>
<center><h1>400 Bad Request</h1></center>
<center>No required SSL certificate was sent</center>
<hr><center>nginx/1.17.5</center>
</body>
</html>
三个用例都符合预期,从第一个测试日志中,我们可以看到,整个通信过程较长,客户端验证服务器端的证书,客户端也将自己的证书上传到服务器端进行验证。使用根证书颁发的两个客户端证书都可以正常发起双向HTTPS认证的调用。没有带客户端证书的调用会被服务器端拒绝服务。
使用PHP调用
$url = 'https://www.test.com';  //你服务器的域名
$content = httpGet($url);
var_dump($content);die;
function httpGet($url) {
    $ch = curl_init();
    //curl_setopt($ch, CURLOPT_VERBOSE, '1');//debug模式,方便出错调试
    //curl_setopt($ch,CURLOPT_STDERR,fopen(dirname(__FILE__).'/log.txt','w +')); //设置日志输出路径
    curl_setopt($ch, CURLOPT_RETURNTRANSFER, true);
    curl_setopt($ch, CURLOPT_TIMEOUT, 500);
    curl_setopt($ch, CURLOPT_SSL_VERIFYPEER, false); //信任任何证书,不是CA机构颁布的也没关系(我们是自己签发的,不是权威机构签发的)
    curl_setopt($ch, CURLOPT_SSL_VERIFYHOST, false); //检测服务器的域名与证书上的是否一致
    curl_setopt($ch,CURLOPT_SSLCERTTYPE,'PEM');  //证书类型,"PEM" (default), "DER", and"ENG".
    curl_setopt($ch,CURLOPT_SSLCERT,dirname(__FILE__).'/cert/client.crt');  //client.crt文件路径
//    curl_setopt($ch,CURLOPT_SSLCERTPASSWD,'123456');   //client证书密码
    curl_setopt($ch,CURLOPT_SSLKEYTYPE,'PEM'); //私钥类型,"PEM" (default), "DER", and"ENG".
    curl_setopt($ch,CURLOPT_SSLKEY,dirname(__FILE__).'/cert/client.key');  //client.key文件路径
    curl_setopt($ch, CURLOPT_URL, $url);
    $res = curl_exec($ch);
    if($res === false)
    {
        echo 'Curl error: '.curl_errno($ch) .' - ' . curl_error($ch);die;
    }
    curl_close($ch);
    return $res;
}

这么优秀的文章 居然没人留下点什么。
学习了。
666